8/28/10

Easy Yakitori


Yakitori is one of my favorite snacks which I also sometimes eat with rice as a heavier meal for lunch or dinner. Making yakitori is easy enough, but this recipe makes it even easier! You'll just need the following:
Ingredients
  • Your choice of the meat - boneless and skinless chicken breast/thigh, chicken skin (you can use the one you've pulled off the chicken breast/thigh), pork belly, bacon
  • Vegetables like leek, green bell pepper, asparagus, shiitake or button mushrooms **
  • Wooden skewers (shorter ones are better; yakitori is not usually served on very long skewers)
  • Ready-made Kikkoman Teriyaki sauce*
  • Powdered ginger (for marinating) **
  • Half a lemon **
  • Container for marinating
  • Grill (coal or gas grill is best for a smokier taste)

*I used ready-made teriyaki sauce because based on my research on yakitori recipes, the components of teriyaki sauce is very similar to yakitori marinade
** optional

Directions
  1. You first cut your meat into bite-sized pcs, about an inch wide. For chicken skin, you can just put the skewer through it right away, as if the skewer were a needle and the chicken skin, cloth.
  2. If you're using vegetables, you can cut them into bite-sized pcs as well and alternate it with the meat, much like in the photo (chicken and leek). For asparagus, it tastes bests when you wrap it with bacon and then put it on the skewers.
  3. Put the meat skewers in a container, dash some ginger powder on 'em, and pour some Teriyaki sauce on it. About a teaspoon per skewer would do the trick; make sure not to drown the skewers but have the meat damp enough to soak in the flavor.
  4. Squeeze half a lemon over the skewers.
  5. Close container and leave to marinate for 30minutes to an hour or two. Don't leave them too long or they might get too salty.
  6. Prepare the grill
  7. When the grill is hot (enough that a drop of the marinade would sizzle), place the skewers on it.
  8. Grill until the meat is cooked, turning it and basting it with left over marinade/teriyaki sauce to make sure it would meat would not dry out.
  9. Serve with a tablespoon of teriyaki sauce drizzled on the meat skewers.
  10. Eat as is or with rice. Enjoy! :)

6/29/10

Spicy Tuna Sashimi Salad


My friends and I always order this when we're at Japanese restaurants, so earlier today, I figured I'll try and make it myself... and I can proudly say that it tastes just as good! :D

This is a great appetizer or side dish. Here's how to make it:

Ingredients
Fresh tuna (sashimi grade) cut into small cubes
Japanese mayonaisse (Kewpie brand is good)
Togarashi (japanese chili powder)
Fresh cabbage leaves
Crushed crunchy tempura flakes*

Directions
Mix mayonaisse and togarishi together first. (Base amount on how spicy you want your dressing to be, and also never use too much mayonaisse that it will overpower the sashimi already.)
Mix the dressing with the sashimi and some of the crunchy tempura
Serve on a bed of fresh cabbage leaves, garnish with more crunchy tempura
Best served chilled!
Enjoy! :D


*To make crunchy tempura flakes, refer to this video.

6/28/10

Beef Teriyaki


Instructions (for 4)
0.5kg Sirloin/Tenderloin cut thinly and in strips
Teriyaki sauce
2 tbsp Garlic powder
2 tbsp Ginger powder
Dash of Ground pepper
Sesame seeds (for garnish)
A griddle

Directions
  1. Marinate beef in teriyaki sauce (just enough to cover beef, but don't let beef swim in the sauce), garlic powder, ginger powder, ground pepper for 1-2 hours
  2. Heat griddle
  3. When griddle is very hot, place the beef (it should sizzle a bit) until cooked. Place rest of marinade on the beef and lower heat. Wait for about 3-5 minutes and transfer to a plate.
  4. Sprinkle with some sesame seeds, serve with hot rice.

Gyoza


Ingredients
(makes about 25+)
250g ground pork
4 cloves garlic minced
1/2 small red onion minced
1/2 tbsp ginger powder
2 tbsp spring onion or chives, chopped into small pieces
1/4 cabbage cut into small pieces
gyoza wrappers
1 tbsp oyster sauce
1 tbsp soysauce
1 tbsp sesame oil

Directions
  1. Mix all the ingredients together very well with spoons or your hands
  2. Using a spoon, get a bit of the mixture and place in the middle of a gyoza wrapper
  3. Using your fingertips, wet the edges of the gyoza wrapper a bit and fold it in half, with the mixture in the middle. Seal the wrapper by making small pleats at the edges or the tip of a fork.
  4. Repeat until all the mixture is used up.
  5. Place the gyoza dumplings in a large NON STICK frying pan (don't crowd the pan too much; leave some space between the dumplings) on medium high heat.
  6. After about 2 minutes, pour some hot water in the pan; just enough to cover half of the dumplings.
  7. Put heat on high and cover the pan with a lid until water evaporates
  8. Put a bit of oil on the dumplings before it sticks too much on the pan
  9. When one side of the gyoza becomes brown, transfer to a plate, brown side up.
  10. Serve with gyoza dipping sauce or plain soysauce + a bit of hot water
  11. Enjoy!!!
*Storage
If you can't finish all the pieces of gyoza, you can place some of the uncooked ones in a tupperware, seperating each layer of dumplings with wax paper. Place in freezer and it will last for a few days up to a week or so. :)

6/13/10

Philly Cheese Steak


Super tasty and easy to make! :)

Ingredients (serves 4)
24ounces beef sirloin cut into very thin strips
1 large onion or 2-3 regular sized onions, chopped
1 small can button mushrooms, mushrooms sliced
4 cloves garlic minced
1 small bottle Cheezwhiz or Cheezwhiz with Pimiento
2 American cheese slices (the one for sandwiches) and/or porvolone
Some cream cheese
Some butter
Worcestire sauce (sp?)
Salt & Pepper
4 italian bread buns (with a crisp crust like cibatta)
Bacon strips cooked crisp (optional)
Red bell pepper cut in slices (optional)

**You don't have to use so much cheese actually. The important cheese ingredient is the CheezWhiz. :)

Directions
  1. Toss beef sirloin with salt and pepper and a few dashes of worcestire sauce. Set aside.
  2. Saute onions, garlic, mushrooms, bell pepper in olive oil.
  3. Saute the sirloin when the onions and garlic start to soften
  4. When sirloin, mushrooms, bell pepper are cooked, and the onions and garlic nicely caramelized, take it out from the pan.
  5. Slice buns in half and spread some butter on them.
  6. Put some of the sauteed ingredients on one half of the bread + some bacon, and liberally some cheezwhiz on it. On the other half of the bread, spread some cream cheese, then put some more cheezwhiz, porvolone, and half of the American cheese slice on it. Put "cheesy" bread on top of the sirloin, mushrooms, etc.
  7. Heat in oven for 5-10 minutes. *If you are bringing it to work or wherever, wrap it in wax paper first before you heat it, so the cheese/s won't be too messy.
  8. ENJOY! :)

6/3/10

Tempura/Gyoza Dipping Sauce

You know that different kind of warm sauce we dip tempura or gyoza in? Not salty enough just to be soysauce, not sweet enough to be something sugary, or sour enough to be vinegar. It has a distinct taste, and it's pretty damn good. You can actually buy it in most Asian supermarkets; I find the Kikkoman brand one to be good. You just have to heat it a bit.

One day I found myself making some tempura and since I don't do this THAT often, I decided to try and make my own dipping sauce. It doesn't taste as authentic as the ones you can try in Little Tokyo, but it works pretty good too (just a little stronger) and is great with gyoza. Here's how I made it:

Mix 1 cup hot water, 1 tbsp rice vinegar, and 2 tbsp light soysauce

5/31/10

Chili Beef Stir-fry


Got the recipe from an Asian Recipes cookbook, but I decided to make a few changes, which made the dish even better! Haha

Ingredients:
500g Beef steak cut into strips
Carrot cut into strips
Brocolli
Some snowpeas
2 Red bellpepper
1 onion chopped
1 small can baby corn
2 cloves garlic chopped
1 tbsp Sesame seeds
1 .5-2 tbsp chili flakes (or more)
Sesame Oil
1 tbsp fresh chopped cilantro

Sauce (Mix in a bowl)
2 tbsp Soysauce
1/2 cup beef broth (or diluted beef buillion)
1 tsp chili flakes
1 tsp cornstarch (optional - only if you want your sauce a little thicker)
1.5 inch grated ginger
3 cloves garlic chopped
1 tsp vetsin

Directions:
  1. Mix beef with a pinch of salt & pepper + sesame seeds, put aside
  2. Saute garlic and onion in sesame oil
  3. When garlic and onion have begun to soften, stir-fry beef for about 3 minutes. Remove and set aside
  4. Add a dash more sesame oil, stir fry vegetables for about 3 minutes.
  5. Pour in sauce, chili flakes, cover wok and let simmer for a few minutes
  6. Return beef to wok, mix with veggies, cover wok again, and let simmer for about 2 minutes
  7. Transfer to serving plate and then sprinkle cilantro over it.
  8. Serve with noodles or hot rice. :)

5/16/10

Crispy liempo (pork belly)


Possibly one of the easiest recipes for pork belly, that you can make even in the comfort of a small studio apartment! (Serves 2)

Ingredients
  • 2 slices pork belly; each cut in half (you can also use a chunkier cut, but that will be harder to fry)
  • 2 cloves garlic
  • salt & pepper
  • ginger powder
  • 5 or 7 spice powder (chili powder works fine too)
  • 1 tbsp soysauce

Directions
  1. Boil pork belly until tender and the blood has oozed out (10-15mins)
  2. Rub the pork with salt, pepper, ginger powder, spicy powder
  3. Pour soysauce on the pork
  4. Leave it for like 30 minutes to an hour
  5. Prepare a frying pan and fill it with about enough oil to cover half of each belly slice
  6. Put in garlic
  7. When oil is very hot (put stove on medium high heat) fry each side of the belly for a few minutes, until pork browns and belly skin has become crispy (it will bubble a little). WARNING: BE CAREFUL frying this, because the oil will be splattering quite violently. Use a splatter shield and/or long tongs while frying to avoid hot oil from hitting your skin
  8. Discard the garlic
  9. Take out pork from the pan and serve with vinegar on the side, rice, and ENJOY! :)

Pineapple Fried Rice


I first tasted Pineapple Fried Rice in Singapore at the hawkers beside Esplanade, and for dinner today, I finally got around to making it. Based on my research and personal taste, here is how I made pineapple fried rice (good for 2-3):

Ingredients
  • Left over fried rice (4-5 cups)
  • 1 can pineapple chunks with juice
  • 3 medium sized shrimp (cut into little pieces)
  • 1 and a half chinese chorizo (sliced)
  • a bunch of cilantro (dried or fresh)
  • 3 cloves garlic
  • 1 egg
  • 1-2 tsp shrimp paste
  • 1 tbsp fish sauce
  • 1 tbsp soysauce
  • 2 chili pepper sliced (more or less depending on how spicy you want it to be)

Directions
  1. In a wok, saute chorizo, garlic, chili, shrimp paste in a little oil
  2. When chorizo's cooked, add the shrimp
  3. When shrimp is pinkish, add in the rice
  4. Mix it all together in the wok then add in the contents of the pineapple chunks can (including the juice)
  5. Keep mixing the rice and then put in the contents of the egg
  6. Mix, mix, mix, and when the rice isn't too wet anymore, add in the chopped cilantro
  7. Mix, mix, mix, then add fish sauce, soysauce
  8. Mix, mix, mix, and then serve! :)

4/27/10

Brunch! :)


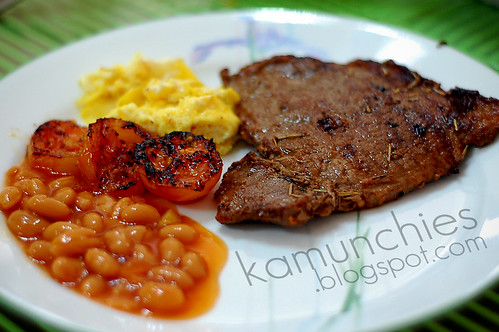
To celebrate the 3000th hit mark, I decided to make something special for my family! One of my favorite meals --brunch! Here I have some steak, grilled tomatoes, pork&beans, and scrambled eggs. I would've cooked some sausages, bacon, potatoes, and served it all with toasted bread and marmalade, but my parents still wanted to eat rice (we're Asian), so it would've been too much if I cooked more meat. Anyway, this here is pretty easy to make!

You just need: (serves 1)
Good quality steak, about 0.5 or less inches
small can of baked beans in tomato sauce (pork & beans)
1 small tomato, sliced
1 egg, beaten
salt and pepper
rosemary; dried or fresh
butter
griddle and/or frying pan
olive oil

Directions:
1. Prepare the steak by rubbing it with some salt, pepper, and rosemary. Spread a bit of butter on it too, and just let the flavors sink in by putting the meat in a small tupperware or ziplock.
2. While the steak's enjoying its rub (haha), make the scrambled egg first: mix a dash of salt and pepper in your beaten egg, fry in hot frying pan with oil. While doing this, heat griddle.
3. When scrambled egg is done, put on serving plate.
4. When griddle is hot, pour a bit of olive oil on one side and put on the tomatoes
5. On the other side of the griddle, grill the steak 5-8 minutes on each side (if you have a small griddle, feel free to do this in batches)
6. When the steak is almost done, melt some butter on it.
7. As for the tomatoes, you'll know it's done when there are small burn marks on it already.
8. Put the steak and grilled tomato slices alongside the scrambled eggs.
9. Heat beans for about 30 seconds to a minute in the microwave or a pan.
10. Serve everything either with toasted bread or rice! :)

Enjoy!

4/19/10

Grilled Teriyaki Fish


For this recipe, you'll need the following (serves 3-4):

1. 3-4 pieces of good quality fish like Salmon or Gindara cut ala steak or steak fillet. (It's better to use fish with the skin on, so there will be a less chance of the fish breaking into pieces while being cooked or transferred from grill to plate.)
2. a small grill or griddle
3. rock salt and ground black pepper
4. 5.5 tbsp of teriyaki sauce
5. 1 tbsp of powdered ginger
6. 2 tbsp of lemon/lime juice

Directions
1. In a small bowl or tupperware, sprinkle the fish with a dash of rock salt and ground pepper, followed by the powdered ginger, lemon/lime juice, and 3 tbsp of teriyaki sauce. Cover container and refrigerate for 20-30 minutes. Make sure to turn over the fish in the middle of the marinating time.
2. Heat grill and brush with oil
3. When grill is very hot, lay down the fish steaks side by side. Grill only 5-8 minutes/side, so that the inside of the steak is still a little slippery and pink (if salmon is used). While grilling, baste using teriyaki sauce left in marinade container.
4. Transfer to a plate (be careful while doing so, if using skinless, boneless steak fillet, or else fish might break!)
5. Pour the 2.5 tbsp left of teriyaki sauce onto fish while it is hot.
6. Serve with a bowl or plate of hot rice, and maybe even a side of vegetables!

Enjoy! :)

3/24/10

Chinese BBQ Ribs


This recipe very, very easy and very, very tasty. I got it from the internet and just modified it a little. You just need the ff:
1. Pork Spareribs
2. Water
3. Chinese BBQ sauce
4. Garlic 3-4 cloves
5. 1-2 inch worth of ginger, sliced
6. Chili flakes/tobasco sauce (how much depends on how spicy you like it)
7. Salt & Pepper

Directions:
  1. Boil the ribs with ginger and some salt until soft
  2. Discard water and ginger (or you can use the broth for some other soup; up to you)
  3. Saute garlic and then brown the ribs' sides
  4. Take out ribs
  5. In the same pan, add Chinese BBQ sauce (enough to coat ribs), chili flakes/tobasco sauce and mix with the garlic
  6. When it simmers, put back the ribs and use a tong to rotate them so that they will be coated with the sauce (you can use a brush too, but I warn you Chinese BBQ sauce is very sticky, so that may be a little difficult)
  7. Simmer for about 10 minutes when ribs have absorbed the sauce
  8. Serve with hot rice! :)

3/6/10

Sweet and Sour Fish

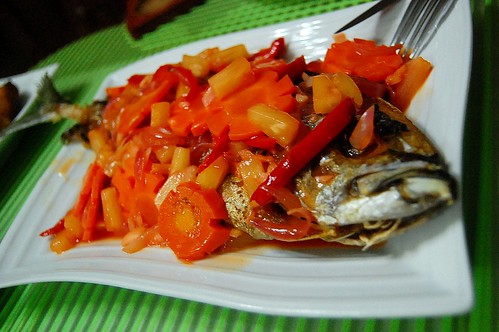
Sweet & Sour Fish

Sweet and Sour Fish is very, very easy. You just need to fry a fish which has been seasoned with salt and pepper. When it's done, set it aside, and prepare the sauce. I don't know how to make sweet and sour sauce from scratch, so I just used a ready made one (our household uses Mama Sita) --the one you mix with water. Instead of water though, pour in the contents of a pineapple cocktail can. Mix it and simmer with the pineapple bits, sliced carrots, sliced onions, and red bell pepper. When it's a little thick (after about 10mins or so), pour over the fish and tada!

Upcoming!!!

So how'd you all like the kansi? I got so many hits after posting that recipe and I'd like to thank you! Hopefully you enjoyed it as much as I did.

Tonight for dinner I learned how to make sweet and sour fish and vegetable spring rolls. I'll be posting the recipes soon enough!

In the meanwhile, I'm planning on making Sticky Chinese BBQ Pork Ribs and Bonchon in the days to come! I'm doing some research now, and it doesn't seem so difficult to make afterall! :)

2/22/10

Kansi

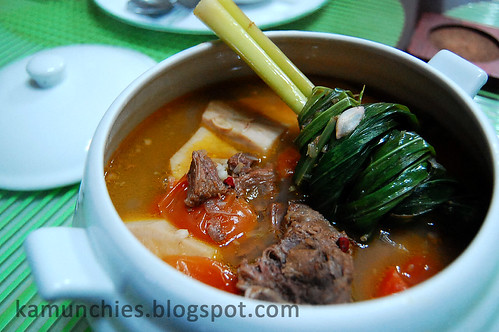
Kansi

Hi, guys! I know I haven't updated for a while; I've been quite busy. I hope this one can make it up to all of you though, it's a very worthy first post for 2010.

This is a dish I first tasted when I lived with my cousin in Virginia. Her husband is a Filipino from Bacolod and his relative, Carmel, who is also from Bacolod made some Kansi for us during one of our parties. Kansi is an Ilonggo recipe that is sort of like a cross between Bulalo (beef bone marrow and vegetables soup) and Sinigang (sour pork soup). Carmel was kind enough to share the ingredients with me, and tonight for dinner, I finally got around to try and put it together. Here's how:

Ingredients
1.Beef Bones (3-5lbs) and/or Beef Shank (3-5lbs)
2.Lemon grass (2 stalk)
3.onion (1 medium)
4.Fresh ginger (1/2 cup, sliced)
5. 1 long hot pepper
6.Atchuete powder(1 Tablespoon)
7.sinigang mix (2 Tablespoon or to taste)
8.Canned Green Jackfruit (1 can)
9.salt & pepper (to taste)
*I also added some garlic to the recipe and tomatoes, and used fresh green jackfruit (sliced) instead.

Directions
1. Saute garlic and onions
2. Add beef and ginger into the pot and pour just enough water to cover most of the meat
3. Leave it to boil for about an hour, thirty to two hours
4. Lower heat to simmer, add more water into the pot until meat is completely submerged
5. Mix in sinigang mix, salt, and pepper (I used about half of the pack of sinigang mix since I liked it more sour)
6. Mix in pepper (add more if you want it to be spicier)
7. Put in sliced green jackfruit
8. Leave to simmer until jackfruit is cooked and beef is very soft
9. When it's almost done, put in lemongrass (tie it into a knot) and atchuete for color
10. Simmer for about 10 minutes and serve with hot rice.

I'm not sure if my version was as good or as authentic tasting, since it's still up to the cook to blend proportions up to his/her liking, but I loved it when I ate it, so you might too!